
Easy Paper Plate Pumpkin Craft for Toddlers

A fun and simple Halloween pumpkin craft.
Are you looking for an EASY fall or Halloween activity for your toddler?
How about one that’s not too messy or expensive?
Try this cute paper plate pumpkin craft!
As soon as the weather starts changing from sticky, humid summer days to crisp and cool fall mornings, it’s time for FALL. Get ready for apple picking, jumping in leaves, and everything pumpkin-related.
Related post: 15 Fun Trick or Treating Alternatives For Kids This Halloween
I LOVE fall and am excited to share some of my favorite Autumn experiences with my kids this year.
I’m always trying to find crafts that my kids can actually do on their own or with minimal help. This pumpkin plate craft is so simple for toddlers to make. Most of the materials are things you probably have around the house, which is a nice bonus.
Older kids will enjoy this activity too and they can get creative with how they decorate their pumpkins.
Here’s a cute and simple paper plate pumpkin craft you can do with your toddler to get in the Halloween spirit this fall.

DISCLOSURE: This post may contain affiliate links to products and services. If you click through these links and make a purchase, I may make a small commission. You can read my Disclaimer Policy for more information.
Pumpkin Plate Pumpkin Craft Materials:
- Paper plates
- Black construction paper
- Green pipe cleaner
- Scissors
- Glue stick
- Orange paint
- Sponge
- Hole punch

All of these supplies were items I already had around the house or in my craft box from previous projects.
I love using paper plates as a background for my toddler’s painting projects. They are much sturdier than construction paper.
Paper Plate Pumpkin Craft Instructions
Gather all your supplies together and prepare a space for you and your toddler to make this pumpkin project.
My daughter does most of her crafts at her own little table which is set up in our kitchen.
She also always wears a toddler smock (her ‘painting shirt’ as she calls it) so she can be as messy as she wants!

Follow these steps to make this simple Halloween pumpkin craft with your kids.
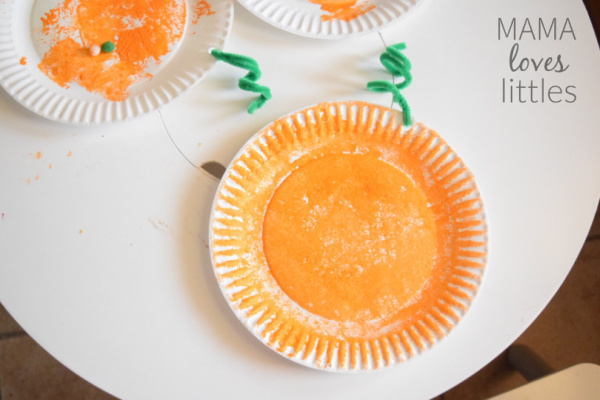
1. Paint the Pumpkin
Cut a kitchen sponge in half to use for sponge painting. This makes it easier to grasp for little hands.
Squirt some orange paint onto a plate.
Now you’re ready to paint your plate using the sponge dipped in orange paint. You may have to show your toddler how to do this and guide her hand at first.
Let the plate dry for a few minutes.
Of course, you don’t have to just stick with orange. You can also make any color pumpkin you want!
My daughter demanded blue paint in addition to the orange. We have a blue pumpkin at home in honor of the Teal Pumpkin Project. I think that is why she was so adamant about using orange AND blue paint.
The Teal Pumpkin Project is a movement to raise awareness of food allergies and make Halloween a safe, fun experience for all kids. We make sure to offer trick-or-treaters who come to our house non-food items like stickers and small toys since so many children have food allergies.
Find more information about the Teal Pumpkin Project here.
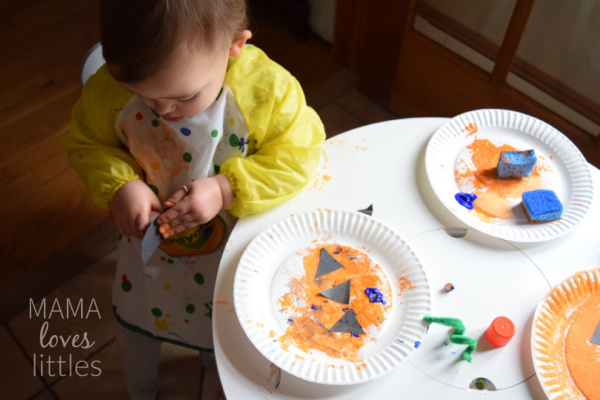
2. Cut Out Shapes for the Pumpkin’s Face
While your painted plate dries, cut out pieces from the black construction paper for the eyes, nose, and mouth.
I cut triangles for the eyes and nose and a half circle for the mouth.

2. Make the Pumpkin (or Jack-O-Lantern) Face
After the orange paint has mostly dried, attach the eyes, nose, and mouth to your painted plate using a gluestick.
I let my daughter paint her own plate and use the glue stick to add the eyes, nose, and mouth to her pumpkin.
She loved being able to do this by herself.

3. The Finishing Touches
To finish, use the hole punch to make a hole in the top of the plate.
Attach the pipe cleaner and curl the ends.
I originally did this as the first step but decided it would be easier to do at the end of the project.

Even though it doesn’t resemble a typical pumpkin, I was pretty proud of my daughter’s creation (and pretty proud of my own)!
I love that she was able to do most of the work herself with minimal supervision from me.

Easy Paper Plate Pumpkin Craft Update
One of the things I love best about this project is that you can do it year after year with your kids.
We first did this activity when my daughter was two years old. We did it again the next year when she was three. It was so fun for me to see how much she had grown in her art skills over that one year.
She was much more deliberate with her painting and the placement of her pumpkin face. Her pumpkin still turned out pretty abstract (but I’m sure that’s the look she was going for)!
I’m excited to see how different her pumpkin turns out next year.


If you liked this activity, check out this Easy Turkey Thanksgiving Craft or Thankful Jar Activity!
Have you made this easy pumpkin plate craft? What other Halloween crafts have you tried with your toddlers?
One Comment