DIY Quiet Book

This past Christmas, I decided to do homemade gifts for my daughter, niece and nephew. I thought a quiet book would be the perfect idea because I’m always trying to find new ways to keep my toddler entertained. I scoured the internet for easy, cheap DIY tutorials. Here I’ve put together some information on how I made my own quiet books (as an amateur DIYer)!

Fair warning — making these quiet books took A LOT more time than I anticipated. It was especially hard trying to put the books together with a busy one year old running around. Although they’re not super professional-looking, I love the way they turned out. I would definitely try making them again now that I actually (kind of) know what I’m doing!
DISCLOSURE: This post may contain affiliate links to products and services. If you click through these links and make a purchase, I may make a small commission. You can read my Disclaimer Policy for more information.
Page Contents
General Materials
- Felt (recommend buying pre-cut squares; I used a pack of 9×12 sheets I found at Michael’s and cut them to 9×9 size.
- A good pair of scissors or a rotary cutter — I didn’t know this was a thing but luckily my crafty mom had one and it was perfect for this project!
- Fabric markers (for drawing lines and templates for cutting)
- Grommet kit
- Binder rings
- Sewing machine or needle and thread
- Hot glue gun
- Velcro (I used pre-cut circles and squares as well as velcro strips)
- Fabric spray
I was originally going to make a no-sew quiet book but changed my mind as the sewing provided extra sturdiness to the book and I like the way it looks. As a “non-sewer”, it was pretty easy to hand-sew some of the smaller parts. However, I recruited my mom (and her sewing machine) for the larger pieces. I would highly recommend sewing your pieces together if you’re able to as it makes the book much more durable.
Quiet Book Color Matching Page

Materials
- Felt
- Velcro
- Glue gun
- Rotary cutter
- Fabric spray
Instructions:
- Cut the square shapes out. A rotary cutter like the one listed above makes it super easy!
- Attach one set of squares to the felt page. You could sew them or use a glue gun but I found adhesive spray to be easy and effective. (Note: I did get the spray all over my fingertips so I’d recommend wearing disposable gloves during this step of the project to save your hands!)
- Attach velcro to both sets of squares. I used velcro dots and used my glue gun to attach them to the felt. Alternatively, you could sew them on or use iron-on velcro.

Learning Goals: Color recognition, learning names of colors, learning the concept of “same”, matching the felt square to the square of the same color.
Tips for using this page: For younger kids/early learners, hold out a color square and say, “Show me the one that’s the same”. For kids working on color recognition, ask “What color is this?” or ask her to point to the color “red” or “blue” etc.
Quiet Book Swimming Fish Page

Materials
- Felt
- String
- Textured Sticker Paper
- Hot glue gun
- Needle and thread
- Googly Eyes
Instructions
- Cut out wave pattern using the textured sticker paper and press onto bottom of felt page to create the ocean
- Cut out fish shapes from felt – two pieces for each fish. You can either use a glue gun to attach the two pieces together or sew the fish using a needle and thread. I think both ways came out pretty good and they both are holding up well! Be careful when sewing/gluing the fish – you want to make sure you are able to still pull the string through the fish.


3. Attach one end of the string to the felt – I sewed the string onto the felt but you could glue it as well (this way might be easier with a thicker piece of string). Make sure you only sew one side of the string at first so you can attach the fish! Slide the fish onto the string. Attach the other side of the string to the felt.
4. Stick eyes on your fish!

Learning Goals: Fine motor – moving fish along the string, imaginative play.
Tips for using this page: Show your child how the fish can “swim” in the ocean by moving them along the string. Talk about the colors on the page. Name the fish. Tell a story about the fish swimming in the ocean and talk about what else you might find underwater.
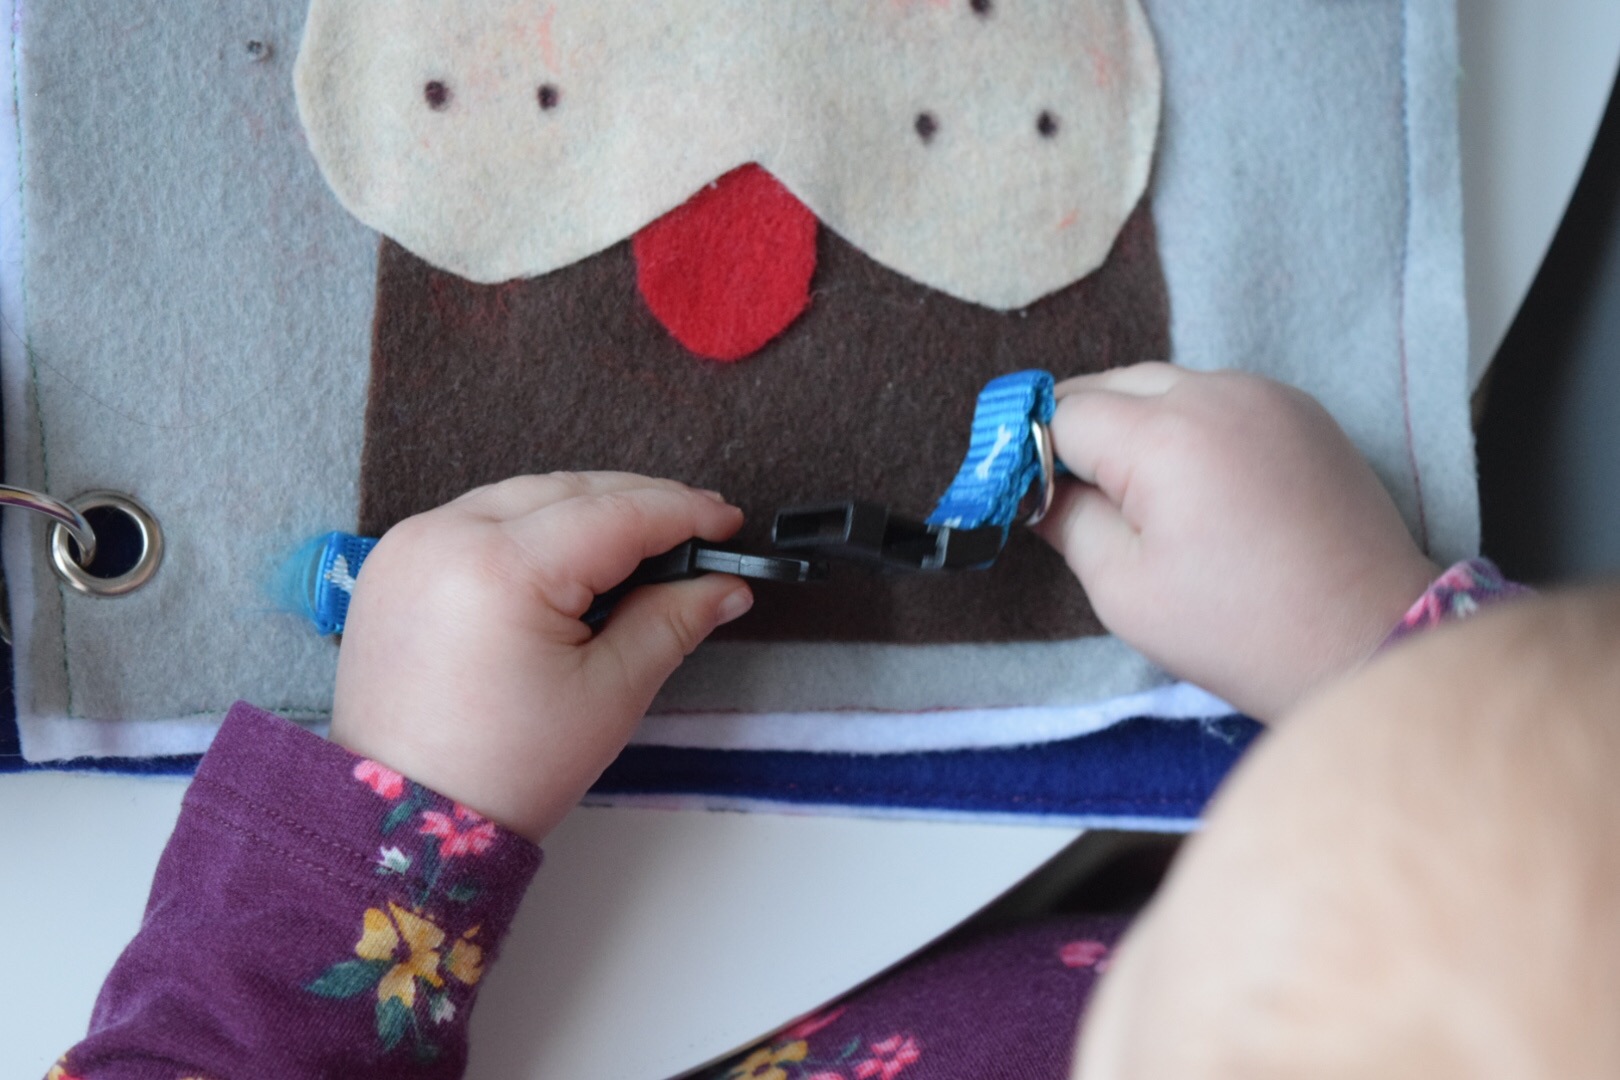
Quiet Book Pizza Counting Page

Materials
- Felt
- Fabric adhesive spray
- Velcro
- Bowl (or something similar for tracing a circle)
- Fabric markers
- Rule
- Hot glue gun
- Rotary cutter
Instructions
- Use bowl or another round object to trace a circle on the tan colored felt (you will need two of these) and then cut out the circles. Use a smaller round object to trace a circle on the white felt and cut this out.
- Attach one felt circle to the felt page using fabric spray
- Using fabric marker, divide circle into 6 slices and number each slice
- Attach the white felt on top of the other tan felt piece (cheese on the dough!) using fabric spray
- Using rotary cutter, cut the tan/white circle into 6 pieces (pizza slices)
- Attach pom poms to each pizza slice (one on one, two on the next one, etc.). I used the glue gun for this part.
- Attach velcro to the numbered slices on the tan piece of felt and to the backs of the pizza slices


Learning Goals: Number recognition. Learning to count. Sensory stimulation (touching the pom-poms).
Tips for using this page: For younger, kids, help your child to touch the pepperoni pom-poms on each “pizza slice” while counting out loud (“One… two. Two!”). Take the slices off the page and point to the written number underneath as you say the number again. For older kids, help them match each slice with the corresponding written number on the page.
Quiet Book Hanging Laundry Page

Materials
- Felt (yellow, green, brown, assorted colors for socks)
- Felt flower stickers
- Ribbon
- Twine
- Clothespins
- Pom poms
- Burlap ribbon
Instructions
- For the trees, I used burlap ribbon to provide a different texture than the felt – cut into a tree shape and attached to felt page with fabric spray. Cut out treetops from green felt and attached to the tops of the trunks with fabric spray. I added pom pom apples for color.
- I used twine for the clothesline, attaching to the page by gluing it under a pom pom
- Cut out half a circle for the basket and sewed this onto the felt page leaving the top open
- For the sun, used different textured ribbons as the rays, yellow felt circle for sun, attached to felt using glue gun.
- Cut out sock shape from felt, I used two pieces and sewed them together for the aesthetic but you could just use one piece.
- Attach the sock to the clothesline using a clothespin! I used mini clothespins but I would recommend just using regular sized ones.
- I added flower stickers for a little more color

Learning Goal: Fine motor skills (maneuvering clothespin, opening basket to put the socks in), imaginative play.
Tips for using this page: Help your child to use the clothespin to release the socks and put the socks into the basket. Talk about the sun and the flowers. Feel the different textures of the sun, the trees and the apples.
Quiet Book Dog Collar Buckle Page

Materials
- Felt (brown, tan, black, white, red)
- Dog collar (I got mine from the Dollar Tree)
- Fabric spray
- Scissors
- Needle & thread
Instructions
- Cut out the different shapes for different parts of the dog. I drew these with fabric maker then cut them out freehand – obviously they aren’t perfect but it worked!
- Make your dog – I used fabric spray to stick all the pieces together
- Cut the dog collar into two pieces and sew onto the page
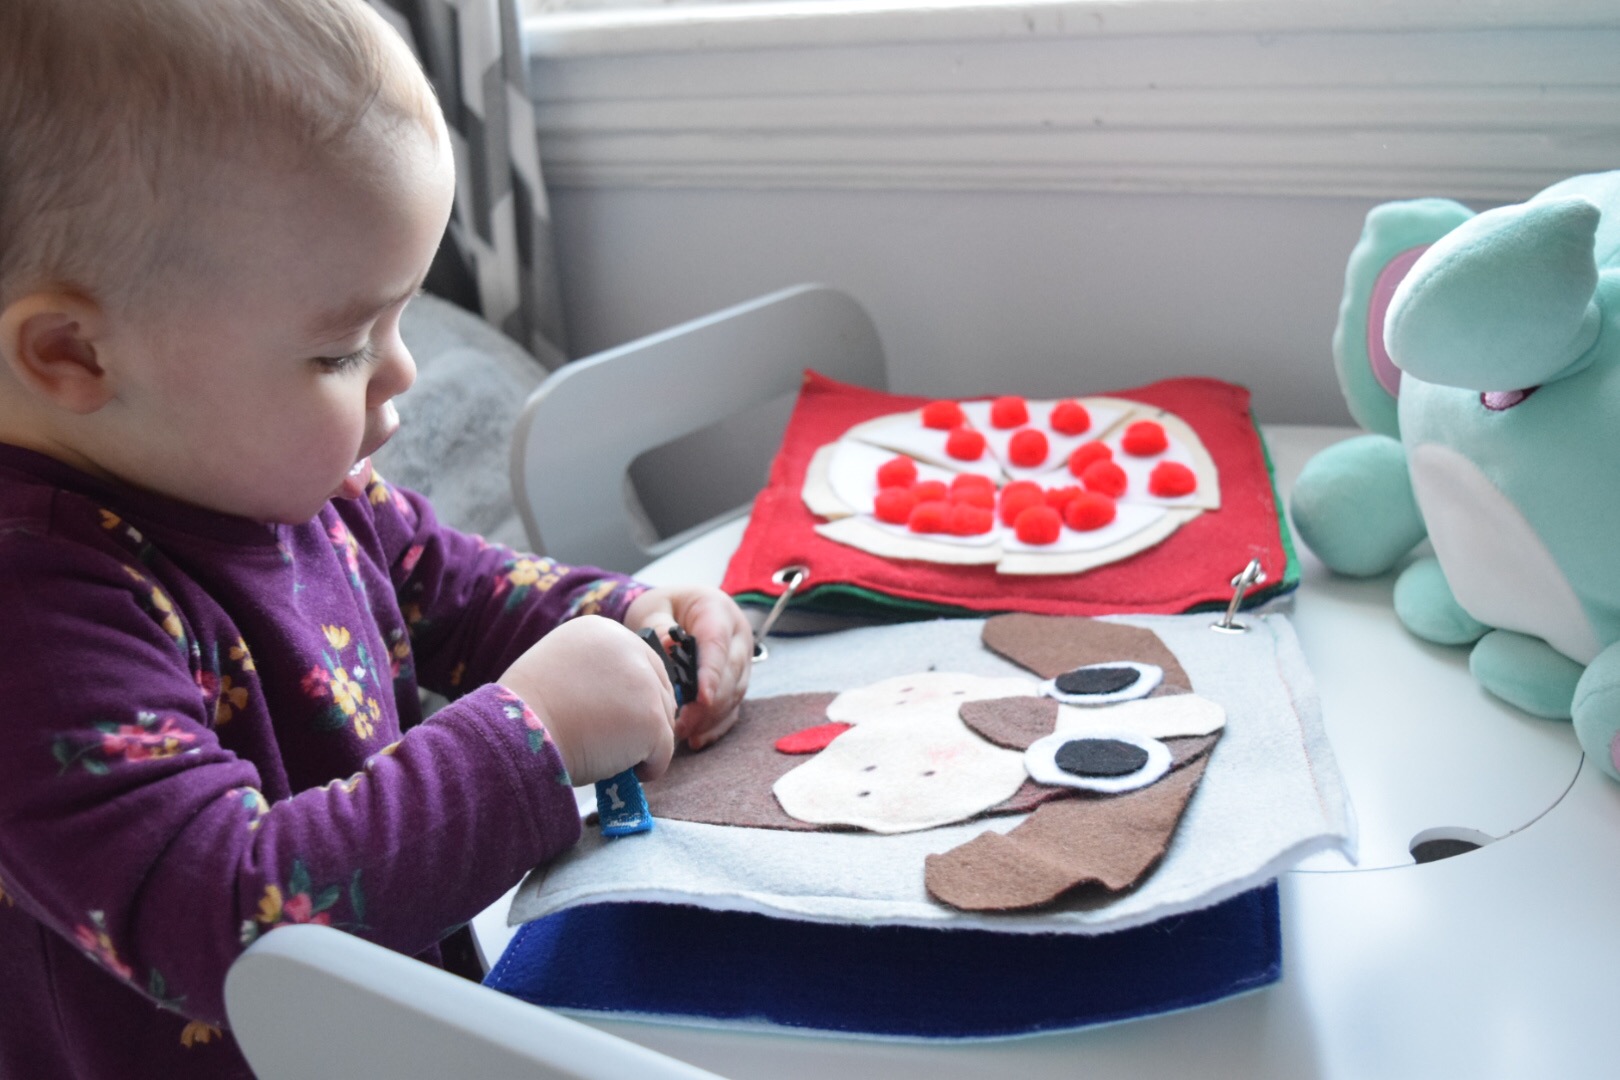
Learning Goal: Fine motor – buckle and unbuckle the collar
Tips for using this page: Show your little one how to unbuckle and buckle the collar. Let them try! Talk about the dog – point out eyes, nose, mouth, ears on the dog, on you and one your baby.
Quiet Book Piggy Bank Page

Materials:
- Felt (pink or any color you chose and another color for the nose)
- Googly eyes
- Zipper (I wasn’t sure were to get these but I finally found these 5 inch zippers at Hobby Lobby in the sewing section)
- Velcro (optional – I used velcro to allow the pig to open up at the bottom to take the coins out more easily)
- Glue gun
- Needle and thread (or sewing machine)
- Toy coins (of course avoid anything that could be a choking hazard so I used large buttons instead)

Instructions:
- Cut out pig shape (two pieces)
- Cut out an area on one of the pig cut-outs for the zippers. Sew zipper onto the pig
- Next, sew the two pig pieces together but leave the legs un-sewn
- Sew the pig onto to the felt page (sew the entire back pig onto the page, leaving the front pig’s legs unsewn)
- Attach velcro to the inside of the pig’s legs
- Add eyes and nose
- Put coins inside and zip it up!


Learning Goal: Fine motor – zippers, putting coins in and taking them out.
Quiet Book Star Puzzle Page

Materials
- Felt
- Cookie cutter or something else to trace shape
- Scissors
- Fabric spray
- Velcro
- Glue gun
Instructions
- Cut out star shape
- Cut out square (I used two layers of felt to make the puzzle more sturdy)
- Use fabric spray to attach the felt pieces together and the shape onto the square
- Cut puzzle into four pieces
- Attach velcro using glue gun to the back of each puzzle piece and onto the felt page
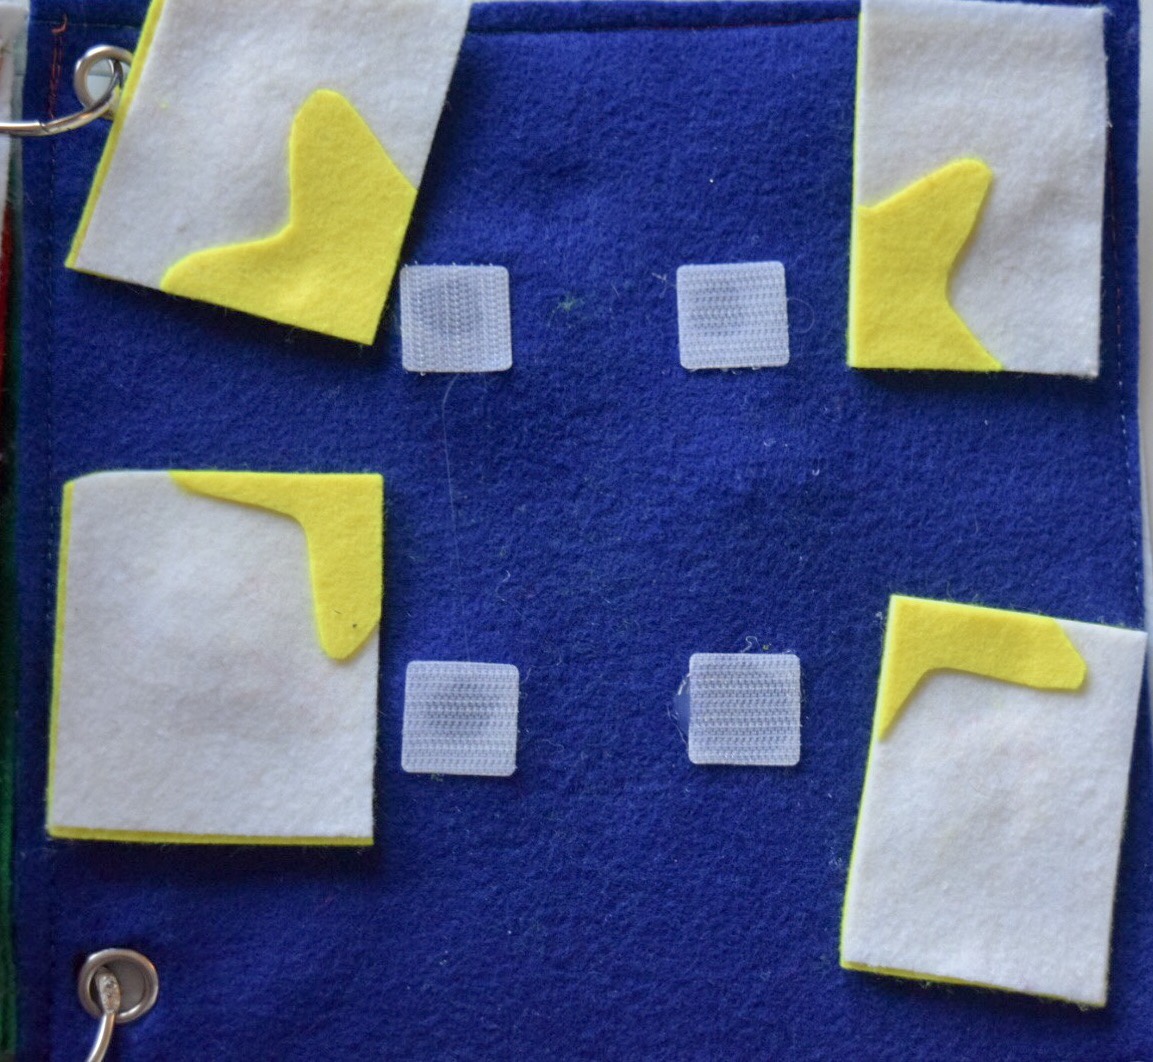
Learning Goal: Complete four piece puzzle
Tips for using this page: Help show your little one how to put together the star puzzle. Sing ‘Twinkle Twinkle Little Star’!
Quiet Book Cover, End Page & Binding

Materials
- Felt square
- Foam letter stickers
- Felt stickers
I made a simple cover page with each child’s name using foam letters I found at Dollar Tree and felt flower stickers (for the girls, sports stickers for my nephew) from Hobby Lobby. They stuck great to the felt but you could also add glue to make it more durable if you’re worried about little hands trying to yank the pieces off.
For the back page, I used a piece of printed felt I found at Hobby Lobby.

I sewed all the pages together (for example the color page was sewn to the back of the cover page, the fish page was sewn to the pizza page).
I loved the idea of connecting the pages with binder rings so you can easily remove and add pages (it also looks nice and neat). To bind the pages, I used binder rings and a grommet kit.
The finished project!

Have you made a similar project? What’s your favorite quiet book page idea? Tell me so I can make it next time!
Any questions? Feel free to ask in the comments!